Wedding photography has earned a well-deserved reputation for challenging even the best photographers. What starts as a labor of love soon devolves into tedious labor, leading many wedding photographers to burn out as work-life balance leans more heavily toward work. Surprisingly, one of the most demanding aspects of wedding photography happens after the wedding day: editing photos! Afterall, over the course of a wedding, which can take anywhere from a few hours up to a few days, wedding photographers capture thousands of images, most of which will need to be edited and delivered to clients in a timely fashion.
In this article, we’re going to share six wedding photography photo editing tips that will increase your efficiency and minimize your risk of burning out, at least due to editing photos.
Tip #1: Establish a Consistent Workflow
When it comes to wedding photography photo editing, having a consistent workflow ranks among the most important “tools” of the trade. Without it, files may get lost, turnaround times will become unpredictable, and the entire photo editing process may take longer than necessary. Here’s a quick breakdown of the steps you’ll need to consider when establishing a consistent workflow.
– Pre-Edit: Pre-editing includes importing and backing up your files. This is probably one of the most important steps in a photographer’s entire editing workflow. You’ll need to import your images directly after a shoot and safely back them up on an external drive of your choice. For added safety, place a separate copy of the raw files on a cloud service of your choice.
– Cull & Edit: We’ll dive into specific tips for this part of the workflow below, but it’s good to know where these elements fit into the overall process.
– Post-Edit: The last thing you’ll need to do before delivering your images is exporting your files, and there are steps you can take to expedite your exports. We’ll cover this in more detail in tip #6 below.
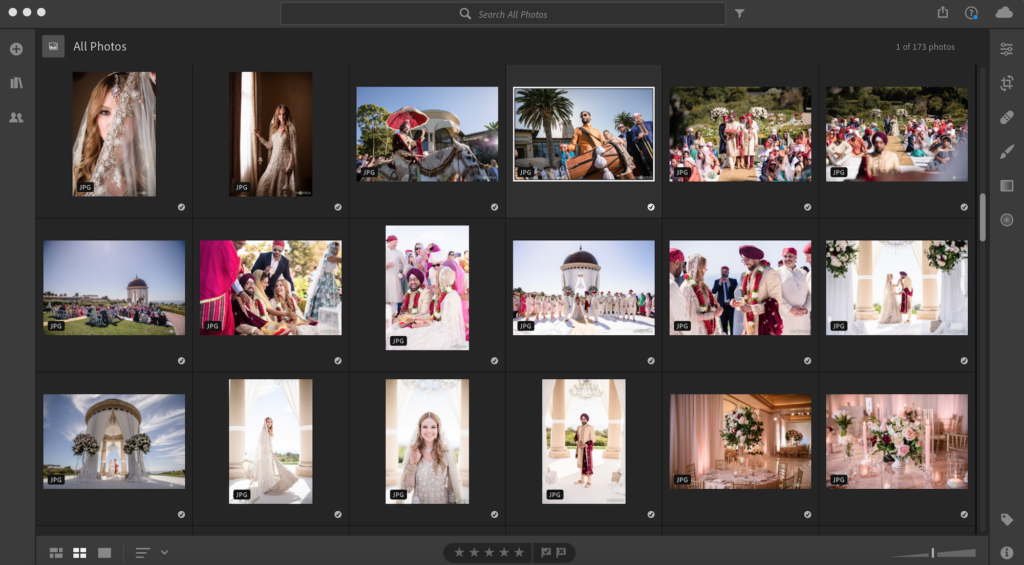
Tip #2: Cull for Storytelling

Keep design in mind for both wedding albums and your blog as you select which images you’ll deliver. In other words, look for photos that will complement one another in a sequence across an album spread or blog entry. For a couples session, for example, Images that work best include slight variations in expression or pose from the same scene with similar lighting. Others to look for include a variety of wide, medium and closeup photographs of a given scene. A great example of this is the bride walking the aisle (see the image above). Hopefully, you will have photographed the wedding with these things in mind to help make the culling process quick and easy. This article from Saaty Photography has outline some of the best engagement poses.
Wedding day is the most important day in one’s life. Getting married means coming together and sharing life. In a moment like this, one should rely on a professional wedding photographer; check out weddingbellz for realistic and natural candid pictures
If you like to know more about natural wedding photography style checkout fikapictures.
Tip #3: Know Your Wedding Photo Editing Software
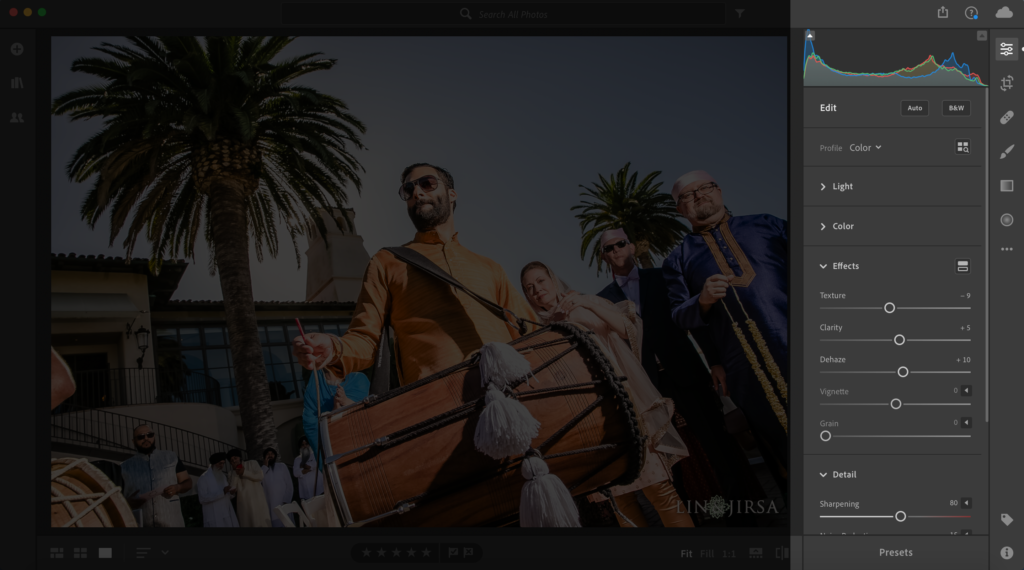
Whichever editing software you use, whether it be Lightroom, Capture One, or something else, get to know the app’s tools for basic editing. For example, here are a few powerful (and time-saving) tools you’ll find in Lightroom that can make or break your images, depending on how you use them; if in doubt, don’t go overboard when making adjustments with any of the following tools:
– Dehaze: Lightroom introduced the Dehaze tool with the recent update. This tool works especially well for recovering detail in backlit photos or any images in which the subjects are washed out in hazy highlights.
– White Balance: While you can try to get white balance right in-camera, using a grey card or manually setting your white balance based on lighting conditions, you may still need to correct your white balance when editing your photos. Use the white balance dropper and select a white or other neutral color in the frame to quickly adjust your white balance.
– Cropping: Cropping is an often underestimated tool. In addition to straightening the horizon and making the image larger or smaller, cropping allows you to refine and/or recompose your photo. What we choose to leave out of the image is equally important to what we choose to leave in.
– Brightness: The brightness slider makes it easy to bump up or lower your exposure, depending on what your image needs. This is one of the most common adjustments photographers make during post-production.
– Contrast: Images can look too flat (with more gray tones and few bright and dark tones), based on lighting conditions or your picture profile settings in-camera, and this is where the contrast slider can help.
– Noise Reduction: The noise reduction slider can help remove grain in an image and smooth out a subject’s skin. Going too far with this tool, however, may result in a painterly look subject with unrealistic skin.
– Sharpen: Use this tool to salvage sharpness in slightly blurry photos. If the original resolution is low or the image looks soft, you can also convert an image to HD using upscaling tools to enhance detail before final edits.
Tip #4: Use Shortcuts, Presets, and Batch Edits to Save Time
Each of the following tools has been designed to speed up your wedding photography editing workflow. Depending on the number of images you edit, using these tools can save you hundreds of hours over the course of a year.
– Shortcuts: One surefire way to speed up your editing process is by using hotkeys, or keyboard shortcuts. There are too many to list here, but it’s worth looking up shortcuts for the tools you use most and memorizing those in order to avoid having to locate and click on them time and again.
– Presets: Use professionally designed presets to get a consistent look and save time. Because presets are generic by design and no two images are exactly the same, you may have to make additional adjustments (usually to exposure and white balance). Still, knocking down your editing process to two or three clicks instead of working through the whole Develop panel for each image can save an immense amount of time.
– Batch Edits: Once you’ve dialled in your edits for each scene, batch process the remaining images in that group. In Lightroom, you can do this one of three ways: you can copy and paste settings from one photo to another, you can synchronize settings between a whole set of photos, or you can actually edit multiple photos at once. Experiment with your editing software and choose a method that best suits your editing style.
Wedding photography is about poses and setups, just different faces and people. Documentary-style wedding photography gives the couple an image that they can relive the wedding day — checkout this resource from Ray Anthony Weddings on documentary wedding photography. Also if you are thinking about outsourcing photo editing, check out ShootDotEdit to make sure your editing style is intact. Wedding photographers and editors can be a huge expense. One of our readers shared her experience with hiring a photographer for her big day. She even considered selling her engagement ring to pay for the editing services that her photographer offered. Long story short, thanks to articles like this and her willingness to keep her beloved wedding ring, she managed to edit all her wedding photos herself. And the results are astonishing
Tip #5: Refine the Wedding Photos Used in Your Web Portfolio
While you should apply basic edits to the majority of the images you deliver, save the detailed edits for those you plan to showcase in your web portfolio. As an example, look at the portfolio images from Clive Blair Photography, a documentary wedding photographer. In other words, only refine the best of the best images you captured. While we don’t have the capacity in this article to dive into advanced wedding photography editing techniques, some basic retouching staples to consider include using noise reduction to minimize grain (unless it’s used for artistic effect) and spot healing or cloning out distracting elements. Furthermore, it’s worth noting that wide-angle shots–in which your subjects are smaller–should require less touch up than close-up portraits, so budget your time accordingly.
Tip #6: Exporting Tips for Blog/Portfolio, Social Media & Print
Once we’ve finished editing our wedding photos, we have a number of places to send & share them. Here’s a quick tip on how to make an export preset as well as some exporting tips for various destinations.
– How to Make an Export Preset: In the export dialog box, click on the “Add” button under the “Preset” panel and choose “New Folder” under the dropdown menu. Name the folder and your new preset (“Instagram_Export”). Create a different export preset for each setting you regularly use, such as “Facebook_Cover_Photo” and so on. Dial in the rest of the settings (export location, file naming, etc.) and save your preset.
– Blog/Portfolio: Check sizing recommendations on your blog & portfolio site before exporting your images. Typically, you’ll want to export your portfolio at “hi-res for print” and your web-based images at 2000px wide with “sharpen for screen” selected in the export dialog box (in Lightroom).
– Social Media: Again, follow sizing recommendations for each of the social media platforms on which you plan to share your images. Here are the settings for Instagram and Facebook:
- Instagram’s sizing guidelines limit image resolution to 1080 pixels wide
- Facebook’s sizing guidelines suggest the following image resolution sizes:
- Regular photos: 720px, 960px or 2048px wide
- Cover photos: 851px by 315px
- To avoid compression when uploading your cover photo, keep the file size under 100KB
- Bonus: From the Facebook app for iPhone or Android, you can adjust your account settings to always upload photos in HD
– Print: Most printers and print labs prefer JPG files, in the color space of sRGB. Some labs may ask for TIF files and/or Adobe RGB color space for better print quality. It’s important to know what your printer/lab prefers.
Conclusion
We hope you found these six wedding photography editing tips helpful. This list is by no means exhaustive, but it does cover the basics to help you organize and streamline your photo editing process.