
If you consider roughly, no difference will appear to you between the guideline made for the beginners and the professionals. But I know I should present any guideline for the novice in detail so that they can grab every corner of a particular skill.
In this article, I am going to offer you a detailed guideline about eCommerce Product Photo editing and retouching for the apprenticed designers. You will get here a concept of what the particular editing type is and how to do it.
Going through the content, you can learn about the leveraging of Photoshop, its tools, filters, and options practically. After reading and practically following the steps mentioned here, you will be capable to work in Photoshop like a pro. I hope you will appreciate it.
eCommerce product photo editing is not so handy and at the same time, if you follow the proper tips and steps, your clients will give you a bonus assume a soft kiss for the outstanding outputs.
Since most photo editing professionals use Adobe Photoshop to enhance image quality, you will enjoy the tutorials experimented here in Photoshop; I think you are a Photoshop passionate.
However, let’s dive into the in-depth guides and tutorials-
How to Remove Background from image?
Giant eCommerce platforms prefer white product image backgrounds since customers’ click-through-rate is higher on clean images than the other messy background. The white background helps in highlighting product details.
For this reason, the demand for product image background removal is more or increasing day by day.
Photographers cannot capture product images with perfect white background by high-configured DSLR even though they tend to use a white sheet or cloth behind the product during photo shot. Additionally, any white things behind the product give a positive contrast. Check out this article from Ymage for more tips on cloth photography.
Though the images contain white backdrops, to comply with the eCommerce marketplaces still they are not suitable. They need to withdraw the backside. And that’s why the background removal in Photoshop is necessary.
The tools of Photoshop the photo editing experts use for background remove-
- Pen tool is the first choice of professionals. It gives the advantage the creating path as per necessity.
- Lasso tool works best for straight edge images.
- Quick Selection tool is great for round images.
- Magic Wand tool selects the image edge magically.
- Brush tool works best for selecting an imaged edge by image masking.
The fantastic Photoshop tools greatly perform for selecting a product image so that you can isolate it from the background or delete the background.
Background Removing Tutorial
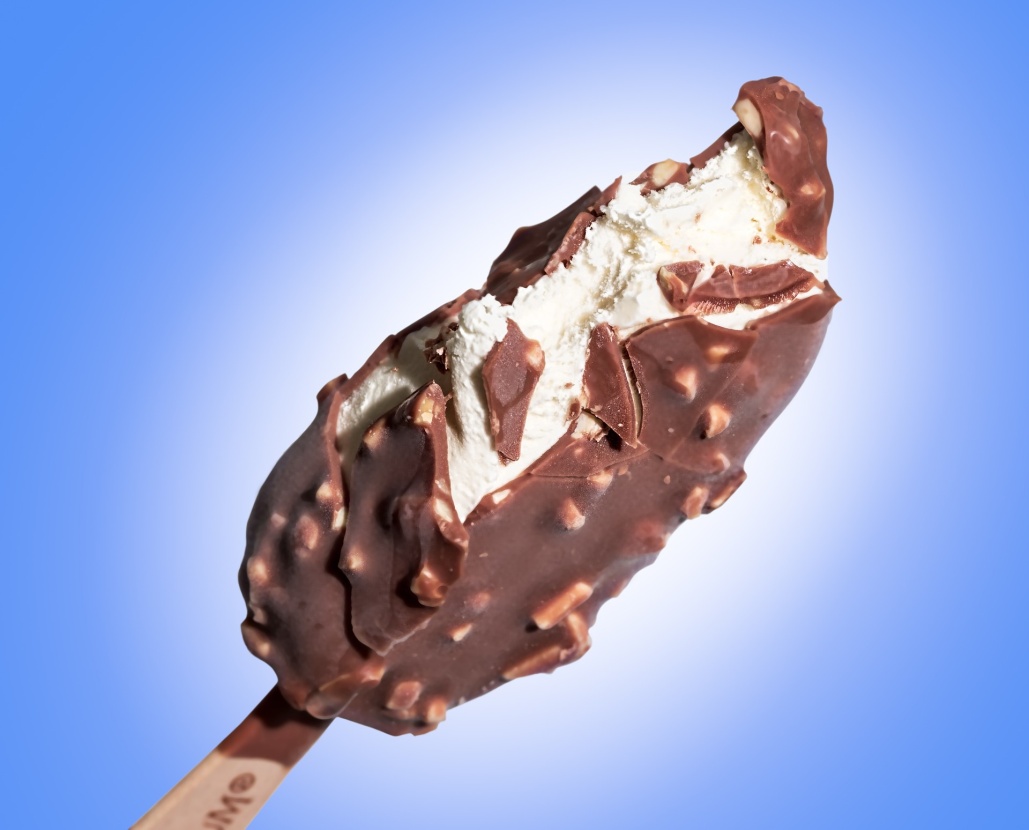
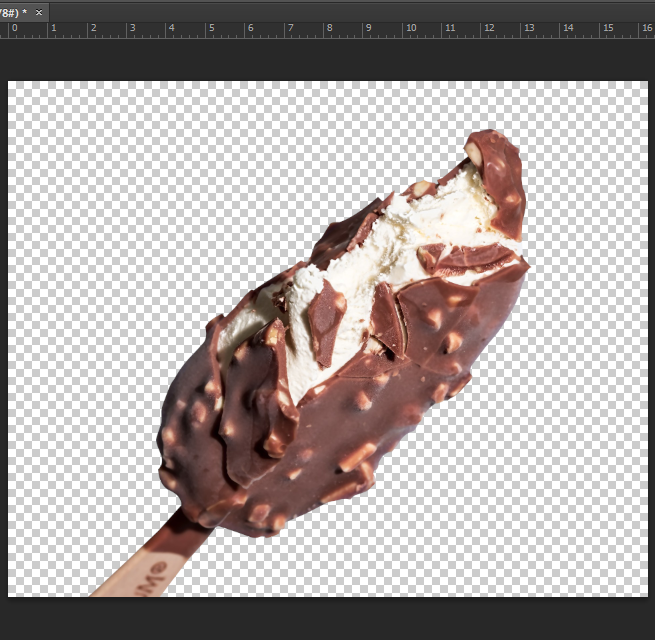
- Take the image you want to remove background in Photoshop. For this tutorial, I am using this testy ice-cream image.
I have used here a convenient product image for this guideline, but you should practice with various types of product photos so that you never fail to fulfill your clients’ needs.
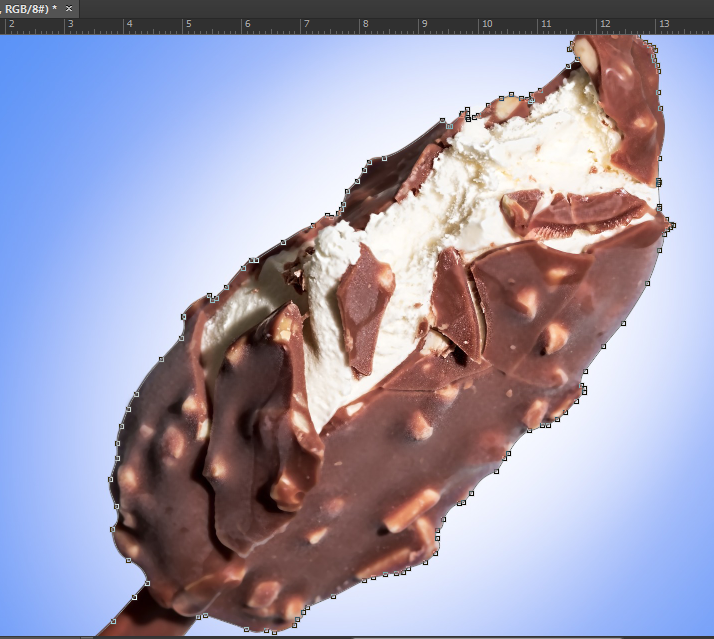
- Take the Pen tool from the left toolbar.
Why the pen tool? Well, most of the photo editing personnel choose this tool for its flexible use. You can handle it properly because of its easy options.
- Zoom in the image 200%-300% as you need.
Why zoom in? Zoom in the image at this bigger range is to get the edge clearly and go across the borderline. You cannot make bigger a low-quality product photo. It will get distorted.
- Create a path around the product image.
As a beginner, you need a keen eye and patience to create a path around the product photo. It will take time. Zoom in the image and keep clicking 1or2 pixels inside the image so that you don’t miss a pixel of background.
It may sound odd of creating a path inside the product image. Exactly, you hear the right way. When you clip the image edge making it bigger, it will not affect the image after zoom out it. Rather it brings about the perfect clipping path.
- Completing the path creation, press Ctrl+Enter to convert the path into a selection.
Once you reach the starting point when you create a path, stop it. You will find a line across the image border. You will get moving and blinking dashes or dots when you hit the Ctrl+Enter button from your keyboard. It refers that your path has converted into selection.
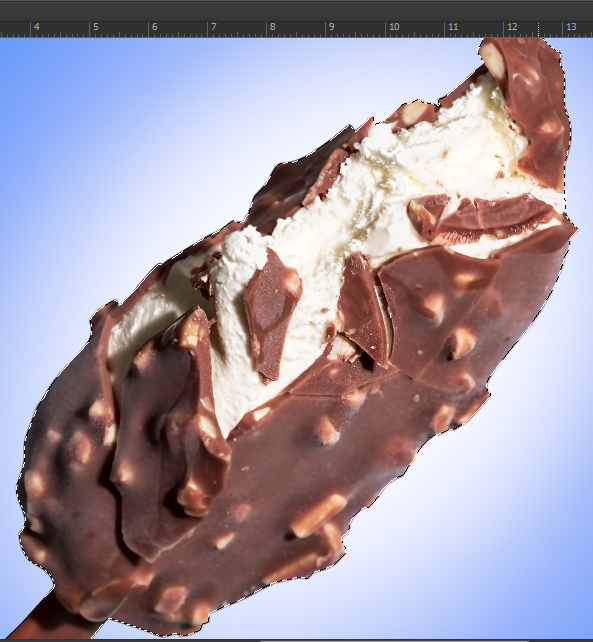
- Press Ctrl+Shift+I to invert the selection.
When you get the selection, it selects the image only, if you now press the Delete button, you will lose the product image instead of removing the background. To fulfill your desire to cut out the background, you have to select it. So, invert the selection.
- Hit the Delete Button and get the background removed.
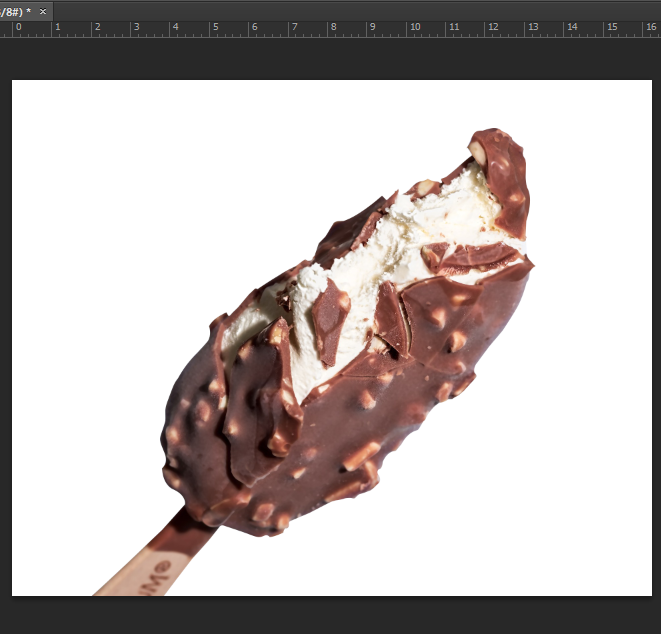
Inverting the selection, you can see the background has got selected. When you remove the background, a transparent background will appear. You can keep this image with a transparent background if you won’t place it on any surface.
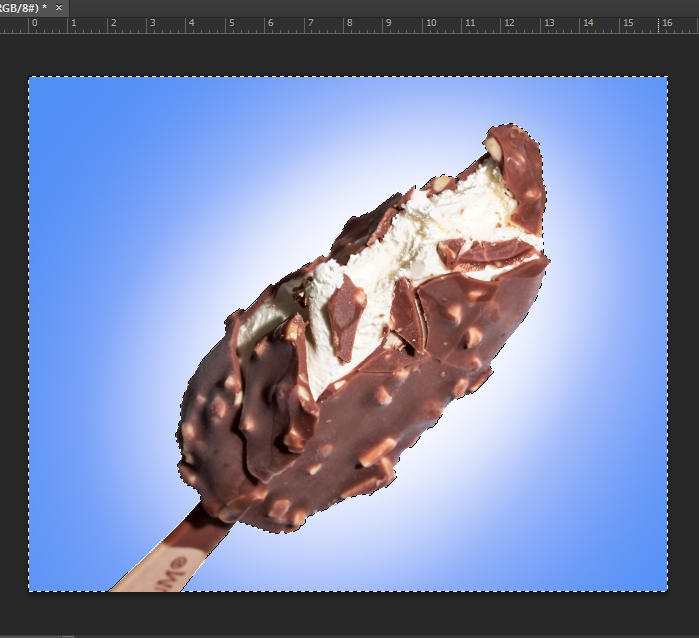
- You will get a transparent background. Now you can use any background.
Look at the snapshot below, I have used white background see through the transparent background. If you need it, you can utilize any other colorful background.
Usually, your clients- the product photographers or eCommerce business owners may want an image with a white background. If they want to get different background colors, you can add in the same way how I remove the background and add a white background.
That’s all about background removing or replacing.
How to Crop and Resize an eCommerce Product Photo
Ecommerce product images require cropping and resizing service. Since the DSLR camera produces a larger image, it cannot be used directly in an online marketplace like Amazon without cropping. So, Photoshop cropping and resizing can be a great skill to serve the product owners.
Cropping & resizing is not so much challenging, but it is useful for bulk images of online product. What is necessary here is to know the required image sizes of different eCommerce platforms. To be a professional image editor, you should have a checklist of image sizes of different online stores.
Photoshop Image Cropping Tool
There is a dedicated photo cropping tool in Photoshop. It is a Crop Tool that will help you resizing any bigger product photo. Not only that, but you can also use other tools like the Rectangular tool.
In the case of a bulk amount of product photos, the professional graphic designers us a template. If all the images require the same sizes, the editors create a new file with the given size and keep the images in this frame. Drag the image to fit the frame, keep the image subject in the center, and save it. Sometimes the experts apply layer masking techniques.
- Photoshop Crop tool dedicated to cropping image.
Photo Cropping Tutorial
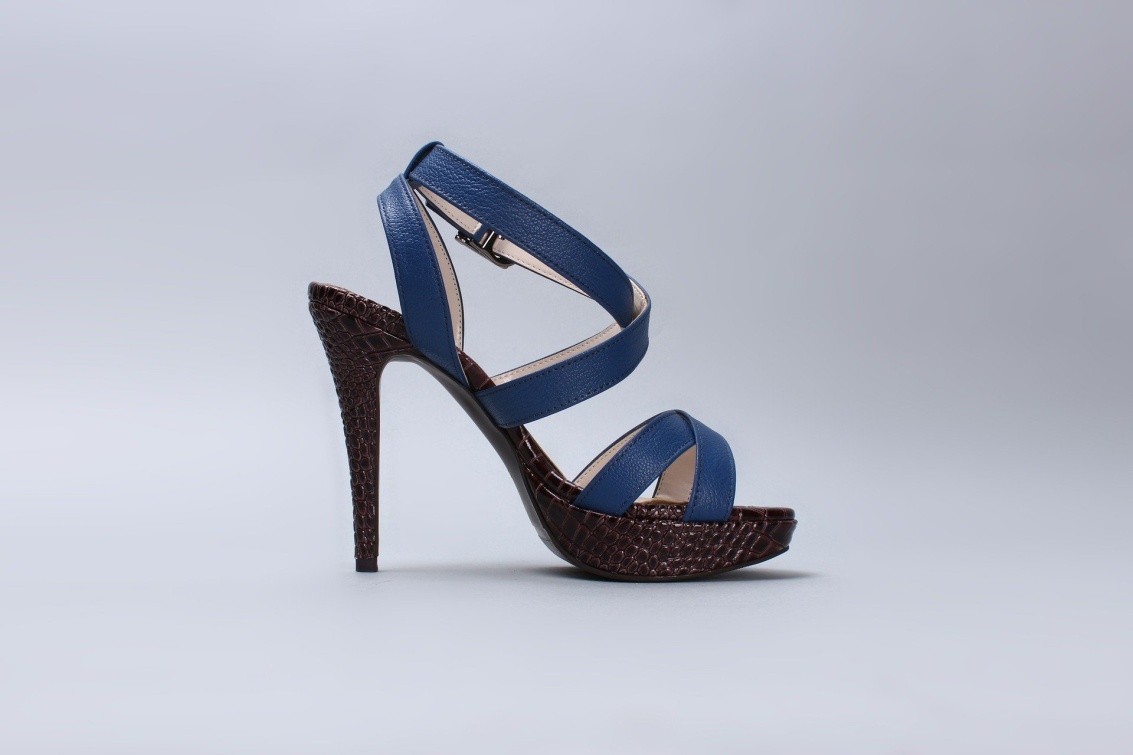
- Take the product image in Photoshop. The image should be, of course, larger than the size you want. See, I have taken an image of woman footwear and will resize it.
- Click on the crop tool from the left toolbar. You will get a dragging option. Now drag it holding the mouse-click until it reaches your desired size.
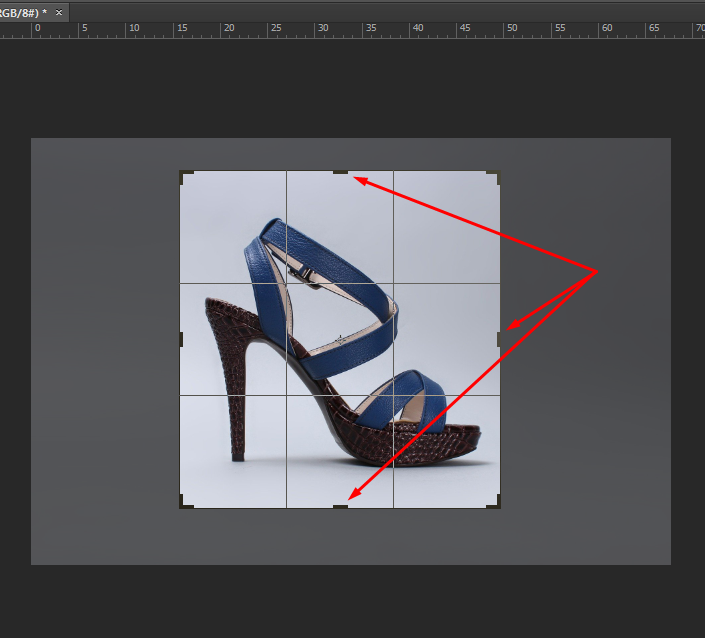
- Now crop the image and save. Look at the tick-mark above panel and click on it. Your image will get cropped. Utilizing the crop tool, you can resize your product photo as per the demand of the eCommerce website.

How to Retouch a Product Image in Photoshop
Retouching is anything like editing. Every editing work is retouching work. Product photo retouching is a challenging task. It is like an acid test for a photo editing expert. Without a perfect combination of skill and experience, photo retouching is not possible.
There are two types of photo retouching you will get from your clients- new product photo retouching and old product photo retouching and restoration. Due to the camera setting or environment, a new photo may get some flaws and the photo editor touches up the image.
Photo Retouching Tools
Have a look at the tools that the photo touch-up experts use to retouch images. Many Photoshop tools are used more or less for retouching a photo, but still, there are some dedicated photo retouching tools.
- Spot Healing Brush is utilized to remove spots from the images.
- Clone Stamp Tool works the same as the Spot Healing Brush tool, but it works more advanced.
- Patch tool is also used to remove anything from an image. It takes samples from a similar place of the image and removes spot and object.
Product Photo Retouching Tutorial
Photo retouching and restoration is a hectic job. You need a lot of knowledge and practices to be a pro product photo retoucher. Little learning of Photoshop and patience will not bring about the high-end product photographs. Also, you can hire a professional like Mount Studio if you need to outsource your product photography.
However, follow the steps to touch up a basic level of the product photo.
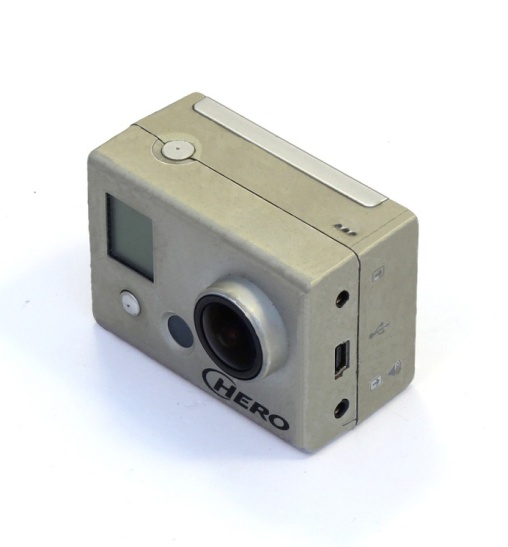
- Open an image that you want to retouch in Photoshop. As a beginner, you should use an image that has a little amount of flaws. Here I have taken an old camera image with a lot of flaws.
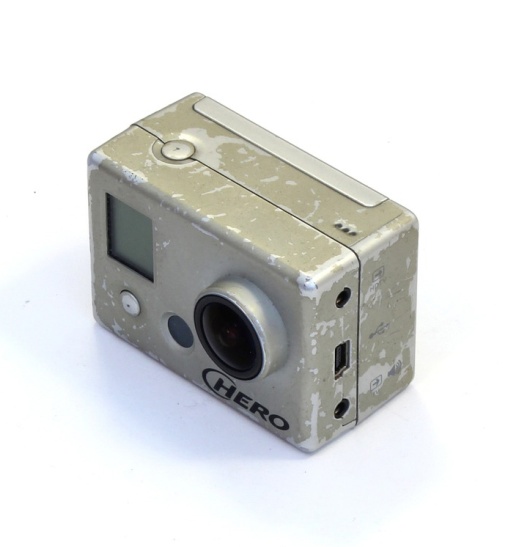
- Take the Spot Healing Brush tool and try to remove all the spots just by clicking on the spots. This tool is effective to remove small spots and scratches.
- Use the Clone Stamp Tool for removing the bigger spots or flaws. It takes samples from the good area holding Alt+Click and then clicks on the spots. Here Patch tool also can be utilized.
- Get the final image and save it in any formats like JEPG or PNG.
To sum up, when I was a beginner, I learned these three photo editing techniques first. Then I created some portfolios, submit those in some local companies, and luckily received a call to join in their company.
Later on, I increase some other photo editing skills such as color correction, ghost mannequin effect, glamor retouching, etc. and started finding a job as a freelancer. Color correction is itself a very important task, you might need to learn a little bit more about that. If you are looking for a resource, our friends at Helter Skelter Studios have written a great article – guide to colour management in product photography.
If you want a job in a local graphic design company or online marketplaces as a product photo editor, learn the above-described skills with patience or if you are interested in film photography here is an excellent guide for you to begin with.
Article Published by Ruhul K. Sagor, who is a Digital Marketing Specialist Since 2008, and currently working as a CMO at Color Experts International, Inc.
Get more resources on how to make background transparent in photoshop